Let’s be real: your phone’s full of photos, but your scrapbooks? Not so much. We all want our memories to feel special, not stuffed in an album-style snooze-fest.
This list of 15 photo scrapbook ideas fixes that. Expect modern layouts, print hacks, collage magic, and a photographer’s dream aesthetic. These are quick, creative ways to turn your digital clutter into pages you’ll want to show off.
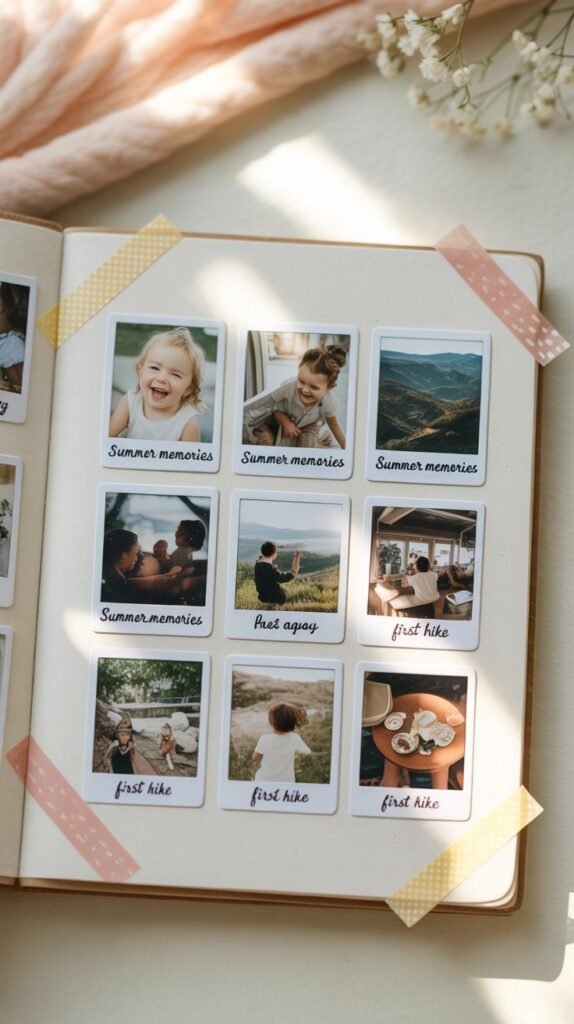
1. Mini Polaroid Grid Layout
Why It’s a Game-Changer:
Polaroid vibes are instantly artsy and retro, with minimal effort. Perfect way to display multiple snapshots in a clean layout.
Materials Needed:
- Small printed photos (like mini polaroids)
- White cardstock for faux frames
- Double-sided tape or glue dots
- Fine-tip pen for captions
How To Do It:
- Stick your photos in a clean 3×3 or 4×4 grid on cardstock.
- Write a one-liner caption below each — think date, place, or a fun note.
- Optionally angle a few photos slightly for a laid-back look.
Pro Tip:
Use colored cardstock or washi tape corner accents to add subtle personality.
2. Flip-Up Photo Panels
Why It’s a Game-Changer:
Add an interactive element to your pages! Flip panels make your scrapbook feel like a secret diary — every fold reveals a new surprise.
Materials Needed:
- Printed photos (3–4 per panel)
- Washi tape or mini paper hinges
- Journaling paper or sticker notes
- Glue stick or double-sided tape
How To Do It:
- Stack photos vertically and connect them with washi tape or folded cardstock hinges.
- Attach the bottom photo to your scrapbook page.
- Write a memory or fun caption behind each flip.
Pro Tip:
Use different patterned papers behind each flip for a bold, layered look.
3. Envelope Surprise Page
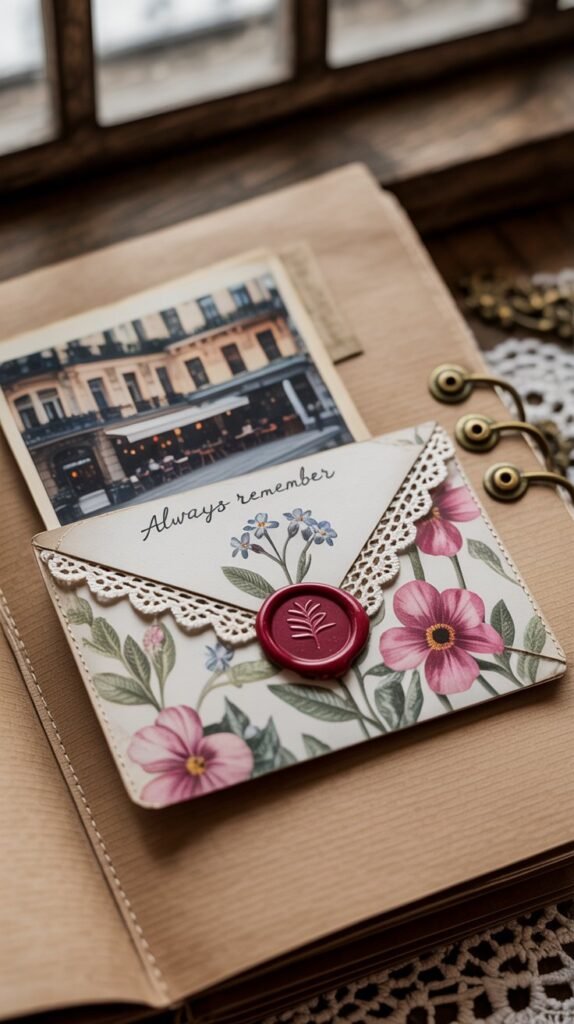
Why It’s a Game-Changer:
Perfect for storing keepsakes, tickets, or private messages with your photos — adds depth to your scrapbook.
Materials Needed:
- Mini envelopes (or DIY your own)
- Decorative paper
- Printed photo or two
- Stickers or stamps
How To Do It:
- Stick a decorated envelope onto your page.
- Add a printed photo on the envelope flap.
- Insert a folded journal note, quote, or flat souvenir inside.
Pro Tip:
Seal the envelope with a wax stamp or sticker tab for an elegant, romantic vibe.
4. Monochrome Aesthetic Page
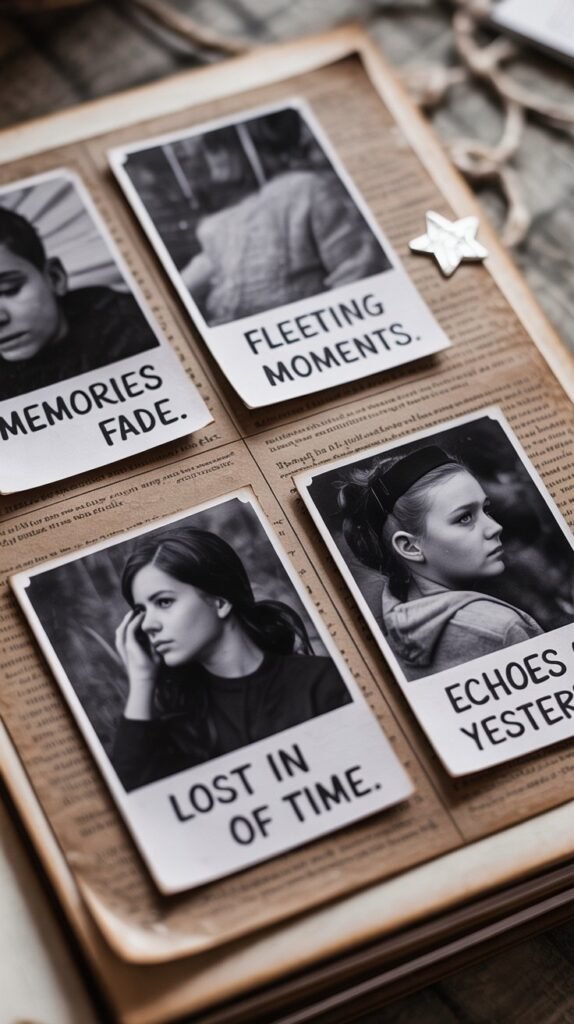
Why It’s a Game-Changer:
It looks ultra-stylish with minimal effort. Keeping everything black-and-white (or one color) makes the page look curated and chic.
Materials Needed:
- Black-and-white photos
- Matching washi tape and cardstock
- White gel pen for journaling
- Monotone stickers or doodles
How To Do It:
- Arrange 2–4 black-and-white photos symmetrically.
- Add journaling with a white pen on black tags.
- Keep the color palette consistent — think grayscale or sepia tones.
Pro Tip:
Add a pop of metallic (like a gold sticker or silver stars) for a luxe touch.
5. Before and After Series
Why It’s a Game-Changer:
Perfect for showcasing transformations — think home decor, haircuts, travel revisits, or even glow-ups.
Materials Needed:
- Two printed photos (before and after)
- Journaling label
- Arrow stickers or doodles
- Neutral background
How To Do It:
- Place “Before” on the left and “After” on the right.
- Use arrows or doodles to connect the two.
- Add a fun caption explaining the transformation.
Pro Tip:
This works great for time-lapse spreads — like one page per year of a growing child or pet!
📷 Picture This:
A side-by-side photo scrapbook layout with ‘Before’ and ‘After’ images of a bedroom makeover. Soft pastel arrows connect the images, and a note says: “from cluttered to calm.” Stylish, fresh, and very relatable.
6. Add a “Tiny Travels” Pocket for Baby’s First Outings
Materials Needed:
- Small kraft envelopes or mini zipper bags
- Washi tape or glue dots
- Mini printed maps or postcards
- Labels or mini tags
How to Do It:
Create a section dedicated to your baby’s first adventures — like their first visit to the grandparents, first park trip, or family weekend getaway. Paste an envelope onto a scrapbook page and fill it with small keepsakes such as ticket stubs, photo booth prints, or a napkin from your favorite café. Label each one with the date and destination. Add a printed Google map snip or small postcard to make it extra memorable.
Picture This:
A kraft envelope sealed with washi tape, labeled “First Trip to Grandma’s,” next to a printed mini map and a photo of baby sleeping in a car seat.
7. Use Transparent Vellum for Layered Memories
Materials Needed:
- Printable vellum paper
- Photo-safe glue or tape
- Typed or handwritten quotes, milestones
- Baby photos (color or black and white)
How to Do It:
Print or write meaningful quotes or journaling on vellum and layer it over baby photos to create a dreamy, ethereal look. This works great for highlighting milestones like first smile or first word without covering the image entirely. Add tiny stars or cloud illustrations to match a celestial or neutral theme.
Picture This:
A soft-focus photo of baby with a semi-transparent vellum overlay printed with the quote “You are my moon and stars.”
8. Design a “Baby Favorites” Page
Materials Needed:
- Stickers or clipart of baby items (toys, bottles, foods)
- Journal prompts
- Mini photos or drawings
How to Do It:
Create a list-style layout with headings like “Favorite Toy,” “Favorite Food,” “Go-to Lullaby,” and “Favorite Person.” Under each, paste small photos or hand-drawn doodles. You can even attach a QR code that links to a video of your baby playing or babbling.
Picture This:
Bright icons of a rattle, teddy bear, and mashed banana next to hand-lettered labels and polaroid-sized photos.
9. “First Year by the Numbers” Infographic Page
Materials Needed:
- Ruler or printable infographic template
- Markers or printable number stickers
- Mini photo grid
How to Do It:
Turn statistics into a cute visual! Include things like “500 Diapers Changed,” “200 Photos Taken,” “12 Doctor Visits,” “365 Days of Love.” Use arrows and icons to make the layout dynamic. It’s a fun, non-traditional way to wrap up the first year.
Picture This:
An illustrated diaper icon next to a bold “500,” surrounded by dotted lines leading to other milestones and baby pics.
10. Create a “What the World Was Like When You Were Born” Page
Materials Needed:
- Printed newspaper or screenshot of the day’s headline
- Popular baby name list from that year
- Fun facts: cost of milk, gas prices, hit song
How to Do It:
Give your baby scrapbook a historical twist by including cultural references from the birth month/year. Add “Top 5 Baby Names in 2024,” favorite trending toys, or a screenshot of Google’s homepage on their birth date. Include the weather that day, major news, and trending TikTok songs (yes, really).
Picture This:
A mock newspaper layout titled “Welcome to the World” with a baby photo in the center and retro font headlines all around it.
11. Add a “Letters to You” Flip Section
Materials Needed:
- Folded cardstock
- Stickers or wax seals
- Pen and envelope or journaling cards
How to Do It:
Dedicate a few pages to handwritten letters for your child to read in the future. One from you, one from their grandparents, or even siblings if they’re old enough. Attach each folded letter to the page with washi tape so it flips open.
Picture This:
A row of pastel envelopes labeled “Dear Baby,” sealed with heart stickers, attached to the page with twine or ribbon.
12. Create a “First Sounds” or “Baby Words” Audio QR Page
Materials Needed:
- QR code generator
- Printed QR code stickers
- Journal or captions
How to Do It:
Upload short clips of your baby’s first laugh, babble, or word to Google Drive or a private YouTube link. Generate QR codes and paste them onto a scrapbook page labeled “First Sounds.” Below each code, add a caption like “Your first giggle – 2 months old.”
Picture This:
Three QR codes side-by-side with doodled sound waves and the text “Listen to Your First Laugh.”
13. Monthly “Before & After” Comparison Collage
Materials Needed:
- Monthly milestone photos
- Grid layout template
- Number stickers or brush pens
How to Do It:
Place a photo from month 1 next to one from month 12 to show your baby’s growth. You can do this in a 2-column format, or make a full-page grid showing 3-4 transformations. Use the same outfit or background each month for an extra “wow” effect.
Picture This:
A 2×6 layout showing baby from tiny swaddle to first birthday crown, each with a stickered number below it.
14. Add a “Family Tree” Scrapbook Insert
Materials Needed:
- Family photos
- Tree diagram printable or stencil
- Labels, calligraphy pens
How to Do It:
Make a page that shows your baby’s lineage. Add mini photos of grandparents, aunts, uncles, and cousins. Draw lines to connect them with the baby at the center. Include cultural roots or origin maps for a personal touch.
Picture This:
A watercolor-style tree with photo “leaves” and name tags, surrounding a central baby photo.
15. Make a “Time Capsule” Page to Revisit on 18th Birthday
Materials Needed:
- Envelopes
- Mini keepsakes (hospital bracelet, a lock of hair, ultrasound photo)
- Folded journal card
How to Do It:
Glue a small envelope or pocket labeled “To Open on Your 18th Birthday.” Inside, include personal items and a letter from you. Encourage family members to add notes too. It’s a sentimental page your child will treasure later.
Picture This:
An envelope sealed with “Open in 2042” next to a flatlay of baby’s hospital bracelet, ultrasound, and a tiny footprint.
FAQ: Baby Scrapbooking Made Simple
Q: What’s the best size scrapbook for a baby memory book?
A: 12×12 inch albums are most common because they offer space for full-page spreads, journaling, and keepsakes. 8×8 is great for minimalists or digital scrapbookers.
Q: How do I avoid ruining original photos or keepsakes?
A: Use high-quality photo copies and acid-free materials. If you’re saving delicate items like a birth bracelet or fabric swatch, store them in protective pockets.
Q: Is digital scrapbooking a good option for baby books?
A: Absolutely! Tools like Canva, Goodnotes, or Procreate make it easy to create printable or shareable baby albums. Plus, you can duplicate the final book for grandparents.
Q: I’m not very artistic—can I still make a cute scrapbook?
A: Yes! Use templates, stickers, and printable kits to make layout design easy. Focus on heartfelt journaling and photos over perfection.
Q: Where can I find baby-themed scrapbook supplies?
A: Etsy, Amazon, and sites like Scrapbook.com offer themed kits. For instant downloads, check Creative Market or use Canva’s pre-made baby layouts.