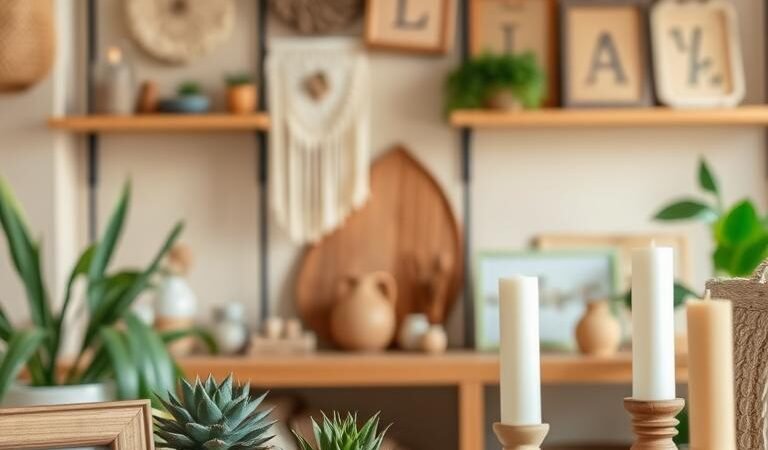
Transforming your living space into a cozy haven doesn’t have to break the bank. With a little creativity, you can give your home decor a fresh new look using simple, budget-friendly DIY projects.
Easy diy home decor projects are perfect for those who want to add a personal touch to their homes without spending a fortune. From painted potted plants to seashell decorations, there are countless ways to enhance your space.
In this article, we’ll explore 15 exciting DIY crafts that will help you create a beautiful and inviting atmosphere in your home. Whether you’re a seasoned crafter or a beginner, these projects are designed to be fun and easy to follow.
Key Takeaways
- Discover budget-friendly ways to enhance your home decor
- Explore 15 unique DIY projects to personalize your space
- Learn how to create a cozy atmosphere with simple crafts
- Find inspiration for using natural elements in your decor
- Get started with easy-to-follow DIY tutorials
Why DIY Crafts For Home Decor Are Worth Your Time
With DIY crafts, you can create a home that truly reflects your personality and style. Engaging in homemade craft ideas for home decor not only allows you to express your creativity but also results in unique pieces that can become conversation starters in your home.
The Personal Touch of Handmade Decor
Handmade decor adds a personal touch to your home, making it feel more welcoming and authentic. Unlike mass-produced decor items, DIY home decor projects are crafted with love and care, giving your space a warmth that is hard to achieve with store-bought items. For instance, customized canvas prints or fabric wall hangings can be tailored to your personal taste, ensuring that your home decor is truly one-of-a-kind.
Cost-Effective Ways to Transform Your Space
One of the significant advantages of affordable diy home decor is its cost-effectiveness. By repurposing materials you already have or sourcing inexpensive supplies, you can transform your space without breaking the bank. This approach not only saves you money but also encourages creativity and resourcefulness. For example, turning old jars into beautiful vases or creating wall art from reclaimed wood can be both budget-friendly and visually stunning.
By embracing creative diy home decor, you can give your home a fresh new look while staying within your budget. This makes DIY decor an attractive option for those looking to refresh their living spaces without the hefty price tag associated with buying new decor items.
Essential Tools and Materials for Your DIY Journey
Embarking on DIY home decor projects requires a thoughtful selection of tools and materials. Having the right supplies not only makes the process smoother but also ensures that the final result is both aesthetically pleasing and durable.
Basic Supplies Every Crafter Should Have
Every DIY enthusiast should have a basic toolkit that includes a hot glue gun, scissors, a craft knife, a ruler, and a pencil. For projects involving fabric, like jute crafts, having a needle, thread, and fabric scissors is essential. Additionally, a good quality adhesive, such as a strong epoxy or decoupage medium, can be very useful.
For decorative elements, consider stocking up on items like ribbons, buttons, and natural materials such as twine or jute rope. These can add texture and character to your DIY home decor projects. A well-stocked supply of basic materials allows you to tackle a wide range of projects, from simple decorative items to more complex furniture renovations.
| Supply | Use |
|---|---|
| Hot Glue Gun | Bonding materials |
| Scissors | Cutting fabric, paper, etc. |
| Craft Knife | Precision cutting |
| Jute Rope/Twine | Decorative element |
Where to Find Budget-Friendly Materials
Finding budget-friendly materials is a crucial part of making DIY home decor projects accessible. Thrift stores, garage sales, and online marketplaces are excellent sources for affordable materials. You can often find gently used or surplus items that can be repurposed for your projects.
For those on a tight budget, dollar stores and discount craft stores can be a treasure trove for supplies. Additionally, consider repurposing items you already have at home. Old jars can become vases, and leftover fabric can be turned into decorative accents. Being creative with what you have can significantly reduce costs.

1. Mason Jar Luminaries with Lace and Twine
With just a few materials, you can craft stunning mason jar luminaries that bring warmth and coziness to any room. This easy DIY home decor project is perfect for those looking to add a personal touch to their living space.
Materials You’ll Need
To create your mason jar luminaries, you’ll need the following materials:
- Mason jars
- Lace
- Twine
- Candles or fairy lights
- Scissors
- Hot glue gun (optional)
Step-by-Step Creation Process
Follow these steps to create your mason jar luminaries:
- Wrap the lace around the mason jar, securing it with twine.
- Tie a bow with the twine around the lid of the jar.
- Place a candle or fairy lights inside the jar.
- If desired, use hot glue to secure any loose ends.

Styling Tips for Different Rooms
Mason jar luminaries can be styled to fit various rooms in your home. Here are a few ideas:
| Room | Styling Tip |
|---|---|
| Living Room | Group multiple luminaries on a coffee table for a cozy ambiance. |
| Bedroom | Place a single luminary on a bedside table for a soft, warm glow. |
| Dining Room | Use luminaries as a centerpiece for a rustic, charming dinner setting. |
These DIY room decor crafts are not only beautiful but also make for unique diy craft ideas for home that can be customized to fit any decor.
2. Rustic Wooden Pallet Wall Art
Creating a statement piece with reclaimed wood is a great way to add personality to your home decor. Rustic wooden pallet wall art is not only eco-friendly but also brings a unique, rustic charm to any room.
Finding and Preparing Reclaimed Wood
The first step in creating your rustic wooden pallet wall art is finding the right materials. Look for pallets that are sturdy and have an interesting texture. You can source pallets from local hardware stores, online marketplaces, or even your own backyard. Once you’ve collected your pallets, disassemble them and clean the wood thoroughly. Remove any nails or debris, and cut the wood into planks of uniform size.
Tips for Preparation: Sand the wood to smooth out rough edges and consider staining or painting to enhance the natural beauty of the wood.
Design Ideas and Techniques
When it comes to designing your wall art, the possibilities are endless. You can create a geometric pattern, a mosaic, or simply arrange the planks in a random yet cohesive manner. Consider the color and texture of the wood, as well as the overall aesthetic of your room.
| Design Idea | Description | Technique |
|---|---|---|
| Geometric Pattern | Create a visually appealing pattern using wooden planks. | Use a template or stencil to achieve precise shapes. |
| Mosaic Art | Arrange small pieces of wood to form a larger image. | Use a combination of staining and painting to enhance contrast. |
| Random Arrangement | Freestyle your design for a more organic look. | Experiment with different plank sizes and textures. |
Finishing Touches for a Professional Look
To give your wall art a professional finish, consider adding a coat of varnish or sealant to protect the wood and enhance its appearance. You can also add decorative elements like metal accents or LED lights to give your piece an extra touch of sophistication.

By following these steps and tips, you can create a beautiful and unique piece of rustic wooden pallet wall art that adds a personal touch to your home decor.
3. Macramé Plant Hangers for Indoor Gardens
Elevate your home decor with macramé plant hangers, a perfect blend of bohemian charm and greenery. Macramé, a craft that involves knotting and cord work, has seen a resurgence in popularity as a means to add a personal touch to home decor. Creating your own macramé plant hangers can be a fun and rewarding DIY project.

Essential Knots for Beginners
To start with macramé, you’ll need to learn a few basic knots. The Lark’s Head Knot and the Square Knot are fundamental to most macramé projects. The Lark’s Head Knot is used to attach your cord to a ring or dowel, while the Square Knot is used to secure and stabilize your work. Practicing these knots will give you the confidence to move on to more complex patterns.
Creating Your First Macramé Hanger
To create your first macramé hanger, start by gathering your materials: cotton rope, a wooden dowel, scissors, and a few basic knots. Begin by attaching your rope to the dowel using the Lark’s Head Knot. Then, work your way down, creating a series of knots and patterns. As you get more comfortable, you can experiment with different designs and lengths. The key is to be patient and enjoy the process.
Best Plants for Macramé Displays
Not all plants are suited for macramé hangers. Plants with trailing vines or those that thrive in hanging baskets work best. Some popular choices include Spider Plants, Pothos, and String of Pearls. These plants are not only beautiful but also relatively easy to care for, making them perfect for macramé displays.
4. Upcycled Vintage Suitcase Side Table
Vintage suitcases are not just for storing memories; they can become stylish furniture. With a bit of creativity, you can transform an old suitcase into a unique side table that adds character to any room. This DIY project is perfect for those who love upcycled decor and are looking for unique diy craft ideas for home.
Sourcing and Preparing Your Suitcase
The first step in creating your upcycled vintage suitcase side table is to find the perfect suitcase. Thrift stores, antique shops, and online marketplaces are great places to start your search. Look for suitcases with interesting designs or sturdy construction. Once you’ve found your suitcase, clean it thoroughly and remove any old labels or debris. If the suitcase is in poor condition, consider restoring it before proceeding.

Adding Legs and Structural Support
To turn your suitcase into a functional side table, you’ll need to add legs. You can use wooden or metal legs, depending on the style you’re aiming for. Attach the legs securely to ensure stability. Additionally, you may want to add a glass top or a wooden board inside the suitcase to provide a flat surface. This not only enhances the functionality but also protects the interior of the suitcase.
| Materials Needed | Purpose |
|---|---|
| Vintage Suitcase | Base of the side table |
| Legs (wooden or metal) | Support and elevation |
| Glass Top or Wooden Board | Flat surface |
Styling Your New Conversation Piece
Once your upcycled vintage suitcase side table is complete, it’s time to style it. You can leave it as is or add decorative elements like vintage lamps, books, or plants. This unique piece of furniture is sure to be a DIY home decor project that sparks conversations. Place it in your living room, bedroom, or study to add a touch of personality and charm.
5. 3D Paper Butterfly Wall Installation
Transform your walls with a stunning 3D paper butterfly installation, a beautiful example of DIY wall art decor. This creative project is perfect for those who enjoy easy DIY art and are looking to add a unique touch to their home.

Paper Selection and Preparation
Choosing the right paper is crucial for your 3D paper butterfly installation. Opt for colored paper or cardstock that is sturdy enough to hold its shape. You can select a single color for a cohesive look or mix and match different colors to create a vibrant display. Ensure your paper is cut into the required sizes for your butterfly template.
Folding and Cutting Techniques
To create the 3D effect, you’ll need to master basic folding and cutting techniques. Start by folding your paper in half to create a crease, then unfold it and cut along the crease to create the butterfly’s wings. Use a template or draw the butterfly shape freehand. For a more intricate design, consider using a craft knife or scissors to cut out the butterfly’s details.
| Technique | Description | Tip |
|---|---|---|
| Folding | Create a crease in the paper to form the butterfly’s wings | Use a bone folder for sharp creases |
| Cutting | Cut along the crease and shape the butterfly | Use sharp scissors or a craft knife |
Creating Dynamic Wall Arrangements
Once you have your 3D paper butterflies ready, it’s time to arrange them on your wall. Start by deciding on a pattern or layout. You can create a random arrangement for a more organic look or follow a specific pattern for a symmetrical display. Use a level and a pencil to mark the spots where you’ll attach the butterflies. Apply a small amount of adhesive, such as a glue stick or double-sided tape, to secure them to the wall.
Experiment with different sizes and colors to create a visually appealing arrangement. Consider adding other decorative elements, like flowers or leaves, to enhance your handmade wall art. With these steps, you’ll have a beautiful 3D paper butterfly wall installation that adds a personal touch to your home decor.
6. Jute-Wrapped Vases and Planters
Transform your ordinary vases and planters into stunning pieces of home decor with the natural beauty of jute wrapping. This simple yet effective DIY project adds a touch of rustic charm and warmth to any room.
Selecting Containers for Transformation
When choosing containers for jute wrapping, consider the shape, size, and material. Terracotta pots, glass vases, and ceramic containers work well. Ensure the surface is clean and dry before you start wrapping.
- Terracotta pots for a rustic look
- Glass vases for a more elegant appearance
- Ceramic containers for versatility
Wrapping Techniques for Different Effects
The way you wrap jute around your containers can create different effects. You can achieve a uniform look by wrapping the jute tightly and evenly, or create a more textured appearance by wrapping it loosely and irregularly.
Tips for wrapping:
- Start at the bottom and work your way up to avoid jute fibers coming loose.
- Use a small amount of glue to secure the jute in place as you wrap.
- Experiment with different thicknesses and patterns for unique effects.

Complementary Plants and Flowers
The right plants and flowers can enhance the beauty of your jute-wrapped vases and planters. Choose plants with varying textures and colors to create a visually appealing display.
- Greenery like ferns and succulents for a lush look
- Flowering plants like orchids for elegance
- Herbs like basil and rosemary for a fragrant touch
7. Painted Terra Cotta Pot Collection
With a little paint and imagination, ordinary terra cotta pots can become extraordinary decor pieces. This DIY project is not only fun but also a great way to personalize your home decor.
Preparing Pots for Painting
Before you start painting, ensure your terra cotta pots are clean and dry. A gentle scrub with soap and water, followed by a thorough rinse, will prepare the surface. Let them dry completely to avoid any moisture interfering with the paint.
Tip: Applying a primer can help the paint adhere better and last longer. Choose a primer suitable for terra cotta.
Design Ideas from Geometric to Botanical
The design possibilities are endless, from geometric patterns to botanical illustrations. You can opt for a simple, elegant look or go bold with bright colors and intricate designs.
- Geometric patterns can add a modern touch to your decor.
- Botanical designs can bring a touch of nature indoors.
- Abstract art can add a unique personality to your space.
“The beauty of DIY decor lies in its uniqueness and the story behind each piece.”
Creating a Cohesive Display
To create a cohesive display, choose pots that complement each other in size, color, or design theme. Grouping them together on a shelf or a mantelpiece can create a visually appealing display.

By following these steps, you can create a beautiful painted terra cotta pot collection that adds a personal touch to your home. This DIY crafts for home decor project is a great way to enhance your living space with painted decor that reflects your personality.
8. Custom String Art Home Sign
Add a personal touch to your home decor with a custom string art home sign. This unique piece of handmade wall art can be tailored to your taste and style, making it a great addition to any room.
Creating Your Template and Base
To start, you’ll need to create a template for your string art design. You can use a piece of cardboard or plywood as the base. Draw your design onto the base using a pencil. For a simple design, you can use a stencil or a printed template. Make sure to keep your design balanced and visually appealing.
Nail Placement and String Techniques
Once your template is ready, it’s time to hammer in the nails. Space them evenly apart, about 1-2 inches, depending on the complexity of your design. To create the string art, wrap the string around the nails in a pattern that follows your design. You can use different colors and textures of string to add depth and interest. Experiment with different techniques, such as weaving or layering, to achieve the desired effect.

Personalizing with Words and Symbols
One of the best things about string art is the ability to personalize it with words and symbols that hold meaning to you. Choose a quote, a name, or a special message that resonates with you. You can also incorporate symbols or icons that reflect your personality or style. This makes your personalized decor truly one-of-a-kind.
By following these steps, you can create a beautiful and unique piece of handmade wall art that adds a personal touch to your home. With a little creativity and patience, your custom string art home sign will be a stunning addition to your DIY wall art decor.
9. Driftwood Candle Holders with Sea Glass
Bring the beach into your home with a beautiful driftwood candle holder adorned with sea glass. This DIY home decor project is perfect for those who love the coastal vibe and are looking to add a touch of the ocean to their living space.

Collecting and Preparing Natural Materials
The first step in creating your driftwood candle holder is collecting the necessary materials. Look for driftwood pieces that are sturdy enough to hold a candle and have an interesting shape or texture. You can find driftwood at beaches or purchase it from craft stores. Similarly, collect sea glass in various colors to add a pop of color to your holder. Clean both the driftwood and sea glass thoroughly before use.
Assembly and Securing Techniques
To assemble your candle holder, start by arranging the driftwood pieces into a stable base. You can use a hot glue gun to secure the pieces together. Once you have your base, glue the sea glass around the driftwood, creating a beautiful contrast between the natural textures. Make sure the candle is securely placed and the holder is stable to avoid any accidents.
Creating a Coastal Vibe in Any Room
Your driftwood candle holder with sea glass is now ready to enhance your home decor. Place it on a coffee table or side table, and light the candle to create a warm, coastal ambiance. This unique piece not only adds a decorative element but also brings a sense of the outdoors into your home, perfect for those who love coastal decor.
10. No-Sew Fabric Wall Hanging
Transform your living space with a beautiful no-sew fabric wall hanging, perfect for those who love easy DIY home decor projects. This creative DIY room decor craft allows you to add a personal touch to your home without the need for sewing skills.

Choosing Complementary Fabrics
Selecting the right fabrics is crucial for a visually appealing fabric decor piece. Choose fabrics that complement each other in terms of color, texture, and pattern. Consider the overall aesthetic of the room where the wall hanging will be displayed. For a cohesive look, pick fabrics that match or contrast with the room’s existing decor.
- Pick a dominant fabric for the main body of the hanging.
- Select contrasting fabrics for accents or trim.
- Consider the texture: smooth, rough, or a mix.
Assembly Without Sewing Skills
Assembling a no-sew fabric wall hanging is easier than you think. Use fabric glue, fusible web, or even clip rings to secure the fabric in place. Here’s a simple method:
- Cut your fabric into the desired shapes and sizes.
- Arrange the fabric pieces on a flat surface to visualize the design.
- Use fabric glue or fusible web to adhere the fabric pieces together or to a backing fabric.
- Allow the glue to dry completely before handling the hanging.
Mounting Options for Different Walls
The mounting method may vary depending on the type of wall you have. For a sturdy installation:
- Use command strips or adhesive hooks for drywall.
- Drill into wooden studs for a more secure hold.
- For concrete walls, use masonry nails or adhesive putty.
Ensure the hanging is level and secure to prevent it from falling.
11. Rope Basket with Leather Handles
Rope baskets with leather handles are not only stylish storage solutions but also beautiful decorative pieces. This DIY project combines the natural appeal of rope with the durability of leather, creating a unique item that can enhance any room in your home.

Materials and Preparation
To start, you’ll need a few basic materials: a rope, leather strips for the handles, a hot glue gun, and some scissors. Begin by preparing your workspace; lay out your materials and ensure your tools are within easy reach. The rope will form the body of the basket, while the leather strips will be used to create sturdy and stylish handles.
- Rope
- Leather strips
- Hot glue gun
- Scissors
Coiling and Shaping Techniques
The process of creating the basket involves coiling the rope into the desired shape and securing it with hot glue. Start with a small base and gradually coil the rope around it, applying glue as you go to hold the shape in place. As you coil, you can shape the basket to your liking, whether it’s a simple round shape or something more complex.
| Step | Description |
|---|---|
| 1 | Create a small base with the rope. |
| 2 | Coil the rope around the base, securing with hot glue. |
| 3 | Shape the basket as desired. |
Practical Uses Throughout Your Home
Once completed, your rope basket with leather handles can serve multiple purposes. Use it as a storage basket in your living room for magazines or throw blankets, or in your bedroom for storing linens or clothing. The leather handles add a touch of elegance, making it a versatile piece that can fit into various decor styles.
“The beauty of DIY projects lies in their ability to personalize your space. A handmade rope basket not only adds a unique touch but also tells a story of craftsmanship and creativity.”
By following these steps and using the right materials, you can create a beautiful and functional rope basket that enhances your home’s decor while providing a practical storage solution.
12. Memory Jar Photo Display
Showcasing memories through a DIY photo display in a jar is a unique decor idea that can add a personal touch to your home. This project allows you to curate your favorite memories and display them in a creative way.
Selecting and Preparing Your Jars
To start, you’ll need to select the right jars for your photo display. Consider using mason jars or other glass containers that are visually appealing. Clean the jars thoroughly and dry them to ensure they are ready for use. You can also decorate the jars with ribbons or paint to match your home decor.
| Jar Type | Size | Decoration Ideas |
|---|---|---|
| Mason Jar | Medium | Ribbon, Twine |
| Glass Container | Large | Paint, Stickers |
Photo Preparation and Insertion
Choose the photos you want to display and prepare them by resizing or cropping them to fit inside the jar. You can roll the photos or place them flat, depending on the design you prefer. Consider adding a caption or date to the photos to make them more meaningful.

Creating Meaningful Arrangements
Once you have your photos and jars ready, start arranging the photos in a way that tells a story or evokes a particular memory. You can mix and match different photo sizes and orientations to create a visually appealing display. Experiment with different arrangements until you find one that feels right.
By following these steps, you can create a beautiful memory jar photo display that adds a personal touch to your home decor.
13. Abstract Canvas Painting for Beginners
For those looking to explore their artistic side, abstract canvas painting is an excellent starting point. This form of art allows for creativity and experimentation, making it perfect for beginners.
Setting Up Your Painting Space
To get started, you’ll need a few basic supplies: a canvas, paints, brushes, and a palette. It’s essential to set up a comfortable and well-ventilated workspace. Cover your work surface with newspaper or a drop cloth to prevent mess. Invest in good quality paints that are suitable for canvas. Having a variety of colors will allow you to experiment with different hues and textures.
Simple Techniques for Stunning Results
Begin with simple techniques such as dripping, splattering, or using a palette knife to apply paint. These methods can create interesting textures and patterns. You can also try layering colors or using a wet-on-wet technique to achieve unique effects. Don’t be afraid to make mistakes – they can often lead to unexpected and exciting results.
- Experiment with different brush strokes and sizes.
- Try combining different materials like sand or fabric for added texture.
- Play with color mixing to create unique shades.
Incorporating Your Art into Home Decor
Once you’ve completed your abstract canvas painting, it’s time to incorporate it into your home decor. Consider the color scheme and style of the room where the painting will be displayed. You can use your artwork as a focal point or as part of a larger gallery wall.  Pairing your art with complementary decor elements can enhance the overall aesthetic of your space.
By following these simple steps, beginners can create beautiful abstract canvas paintings that add a personal touch to their home decor.
14. Seasonal Wreath with Natural Elements
Enhance your home’s ambiance with a seasonal wreath that incorporates the beauty of nature. A seasonal wreath is a versatile and creative way to decorate your home, reflecting the unique characteristics of each time of year.
Selecting a Base and Materials
When creating a seasonal wreath, the first step is selecting a suitable base. You can choose from various materials such as grapevine, wire, or foam wreath forms. The base you select will influence the types of natural elements you can use. For example, a grapevine wreath works well with dried flowers and foliage, while a wire frame can support more substantial items like pinecones and branches.
Assembly and Securing Techniques
To assemble your wreath, start by gathering your natural elements. For a spring wreath, you might use flowers like tulips or daffodils. For autumn, consider incorporating leaves, acorns, and dried corn husks. Use floral wire, hot glue, or wire cutters to secure your materials to the wreath base. Make sure to balance your design by distributing the elements thoughtfully around the wreath.
Adapting Your Design for Different Seasons
One of the joys of creating a seasonal wreath is adapting your design to reflect the changing seasons. For winter, incorporate evergreen branches, holly, or mistletoe. In summer, bright flowers and lush greenery can create a vibrant display. Consider the color palette and textures that evoke the feeling of each season, and don’t be afraid to experiment with different materials and arrangements.
| Season | Natural Elements | Colors |
|---|---|---|
| Spring | Flowers (tulips, daffodils), greenery | Pastels, greens |
| Summer | Bright flowers, lush greenery, seashells | Brights, corals, whites |
| Autumn | Leaves, acorns, dried corn husks, pinecones | Oranges, reds, yellows, browns |
| Winter | Evergreen branches, holly, mistletoe, pinecones | Greens, silvers, golds, reds |

By following these steps and tips, you can create a beautiful and unique seasonal wreath that enhances your home decor throughout the year.
15. Wooden Photo Transfer Wall Art
Adding a touch of personal history to your living space is now possible with wooden photo transfer wall art. This unique DIY project allows you to transform cherished memories into beautiful pieces of home decor.

Preparing Your Wood Canvas
To start, you’ll need a wooden canvas or panel. You can use a reclaimed piece of wood or purchase a wooden panel from a craft store. Sand the surface to ensure it’s smooth and even. If necessary, apply a coat of gesso or primer to create an ideal surface for the photo transfer.
Photo Transfer Process Step-by-Step
The photo transfer process involves several steps:
- Print your chosen image using a laser printer on regular paper.
- Apply a gel medium to the wooden surface.
- Place the printed image face down on the wood and smooth out any air bubbles.
- Allow the image to dry completely before gently removing the paper.
- Seal the image with a coat of varnish or polyurethane.
Finishing and Displaying Your Creation
Once the photo transfer is complete, you can add a finish to protect the image and enhance the wood’s natural beauty. Consider using a clear varnish or polyurethane for a glossy finish. Finally, hang your DIY wall art decor in a place of prominence, such as above a sofa or along a staircase, to add a personal touch to your home.
By following these steps, you can create a stunning piece of wooden decor that showcases your favorite memories and adds a unique element to your home decor.
Conclusion: Bringing Your Personal Style to Life Through DIY
DIY crafts for home decor offer a unique way to infuse your living space with personal style. The 15 projects covered in this article demonstrate the versatility and creativity of DIY home decor ideas. From rustic wooden pallet wall art to abstract canvas painting, each project allows you to add a personal touch to your home.
By incorporating these diy crafts for home decor into your space, you can transform your home into a reflection of your personality and style. Whether you’re looking to add a statement piece or create a cohesive look, these home decor ideas provide the perfect starting point.
Embracing DIY home decor not only enhances your living space but also allows you to express your creativity and individuality. As you’ve seen through the various projects, diy crafts for home decor can be both fun and rewarding, enabling you to bring your personal style to life in a meaningful way.