Transform your living space with the creative and affordable world of DIY clay wall art. This versatile medium allows you to add a personal touch to your home decor, making it truly unique. Whether you’re a beginner or an advanced crafter, clay projects offer endless possibilities for self-expression.
With DIY clay wall art, you can create beautiful pieces that reflect your personal style and add character to any room. From simple hangings to complex sculptures, the variety of projects is vast, and the satisfaction of creating something handmade is immense. You can customize your wall art to match any home decor style, from minimalist to bohemian.
Key Takeaways
- Create unique home decor with DIY clay wall art
- Customize your wall art to match any home decor style
- Suitable for crafters of all skill levels, from beginners to advanced
- Endless possibilities for self-expression with clay projects
- Add a personal touch to your home with handmade decor
Getting Started with Clay Wall Art
Before diving into clay wall art, it’s crucial to familiarize yourself with the different types of clay and essential tools.
Types of Clay for Wall Art Projects
When it comes to clay wall art, the type of clay you choose can significantly impact your project’s outcome. The most popular types include polymer clay and air-dry clay. Polymer clay, such as Sculpy Clay, Fimo Clay, and CraftSmart Clay, is oven-bake and offers durability and a wide range of colors. Air-dry clay, on the other hand, is a more natural option that doesn’t require baking.
Essential Tools and Supplies
To get started with clay wall art, you’ll need some basic tools and supplies. Essential tools include rolling pins, cutting tools, and texture makers. Protect your work surface with wax paper, parchment paper, or plastic wrap, and have paper towels on hand. Conditioning your clay properly before beginning any project is also crucial for the best results.

Basic Clay Techniques for Wall Art
Mastering basic clay techniques is essential for creating stunning wall art pieces. To get started, you’ll need to understand the fundamental processes involved in shaping and molding clay.
Conditioning and Rolling Clay
To condition polymer clay, knead it in your hand until it’s soft and smooth. This process makes the clay more pliable and easier to work with. Line your workspace with plastic wrap or parchment, then use a clay rolling pin to roll the clay out to about 1/4″ thickness, ensuring an even rolling process.
Cutting and Shaping Techniques
Once your clay is conditioned and rolled out, you can start cutting and shaping it into various shapes. Use craft knives, cookie cutters, or templates to create the desired forms. You can also add texture to your clay piece using household items, enhancing the overall design.
- Use sharp cutting tools for clean edges
- Experiment with different textures and patterns
- Join multiple clay pieces securely for complex designs
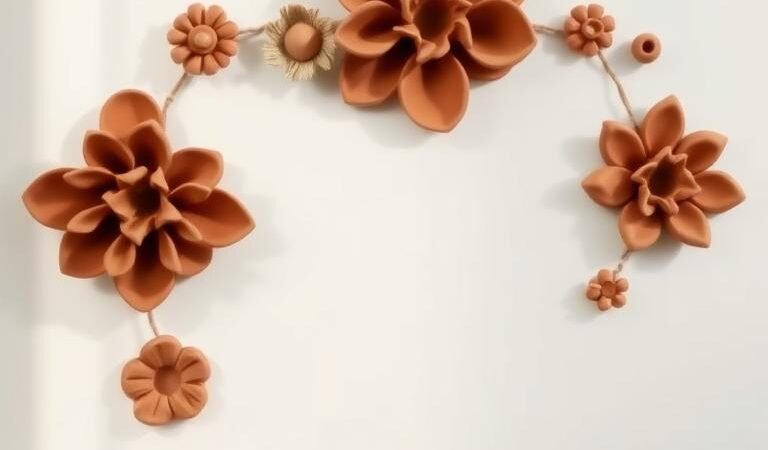
Clay Wall Hangings
Clay wall hangings have become a popular form of decorative art, offering a visually striking way to enhance any room. These hangings can be customized to fit various home decor styles, making them a versatile choice for DIY enthusiasts.

Moon Phase Wall Hanging
One of the most captivating clay wall hanging ideas is the moon phase design. To create this, you can cut out different moon shapes from clay, such as crescent moons, half moons, and full circles for the new moons. You can also experiment with creating an arch or rainbow shape by cutting out another half circle with a smaller template. Arranging these phases in the correct order and connecting them creates a cohesive and beautiful piece of wall art.
The color options for moon phase hangings are vast, ranging from natural tones that blend with any decor to metallic finishes that add a touch of luxury. You can choose colors that resonate with your personal style or match your existing home decor.
Abstract Geometric Designs
Abstract geometric designs are another popular choice for clay wall hangings. By using basic shapes like circles, triangles, and rectangles, you can create intricate and visually appealing designs. Achieving clean lines and precise angles is crucial in geometric clay pieces, and using the right tools can make a significant difference.
Incorporating different textures and patterns into your geometric wall hangings can add depth and interest. You can also experiment with varying shapes and sizes to create balanced compositions that are aesthetically pleasing. Customizing these projects to match your specific home decor style is easy, making them a great option for anyone looking to add a personal touch to their walls.
Textured Clay Wall Tiles
Textured clay wall tiles are an excellent way to add a personal touch to your walls, allowing for endless creativity in design and pattern. These versatile pieces of art can be arranged in various configurations to suit your decor style.

One of the most striking types of textured clay wall tiles is the carved mandala tile. To create these intricate designs, start by conditioning your clay to achieve a uniform consistency. Then, use a rolling pin to flatten the clay to your desired thickness. Mandala patterns can be carved into the clay using specialized tools or everyday items like toothpicks.
Carved Mandala Tiles
To achieve symmetrical designs, use a compass or a stencil as a guide. When carving, apply even pressure to ensure consistent depth. This technique will help you create intricate patterns that add visual interest to your wall.
Imprinted Nature-Inspired Patterns
Another way to add texture to your clay tiles is by imprinting nature-inspired patterns. Press natural elements like leaves, flowers, or shells into the clay to create unique designs. To preserve fine details, make sure the clay is not too dry or too soft.
| Technique | Description | Tools Needed |
|---|---|---|
| Carving | Create intricate designs by carving into the clay. | Specialized clay tools, toothpicks |
| Imprinting | Press natural elements into the clay for unique patterns. | Leaves, flowers, shells |
Once you have created your textured clay wall tiles, you can arrange them into larger wall art compositions. Experiment with different color schemes, from monochromatic to complementary colors, to enhance the textured designs. Finishing techniques like applying a glaze can highlight the textural elements, making your clay wall art truly stand out.
Minimalist Clay Wall Art DIY Ideas
Minimalist clay wall art DIY projects are ideal for beginners looking to make a sophisticated statement. The beauty of minimalist designs lies in their simplicity and elegance, making them perfect for those who appreciate clean lines and uncluttered spaces.
One of the key advantages of minimalist clay wall art is its ability to complement various interior design styles. Whether you’re decorating a modern living room or a cozy bedroom, minimalist clay art can add a touch of sophistication.

Simple Shapes and Forms
Simple geometric shapes are the foundation of minimalist clay wall art. By arranging these shapes in visually interesting patterns, you can create a unique piece that adds character to any room.
Precision and symmetry are crucial in minimalist clay art. To achieve a professional look, it’s essential to create perfectly smooth surfaces and clean edges. This attention to detail will elevate your DIY project and make it look more refined.
Monochromatic Clay Designs
Monochromatic color schemes can significantly enhance minimalist designs. By using different shades of a single color, you can create depth and interest without overwhelming the senses.
Incorporating texture into minimalist pieces can be done subtly. For example, you can add a slight texture to your clay shapes to give them a more organic feel without detracting from the overall minimalist aesthetic.
| Design Element | Minimalist Approach | Benefits |
|---|---|---|
| Shapes | Simple geometric forms | Creates a clean and uncluttered look |
| Color | Monochromatic schemes | Enhances the minimalist aesthetic |
| Texture | Subtle texture additions | Adds depth without overwhelming the design |
When arranging your minimalist clay wall art, consider the spacing and balance of the composition. A well-balanced arrangement will ensure that your piece looks harmonious and visually appealing.
“The simplicity of minimalist clay wall art is what makes it so powerful. It’s not just about what’s there, but also about what’s not.”
By embracing the principles of minimalist clay wall art, you can create beautiful, sophisticated pieces that enhance your home decor. Whether you’re a beginner or an experienced crafter, the simplicity and elegance of minimalist designs make them an excellent choice for any DIY project.
Colorful Clay Wall Sculptures
Colorful clay wall sculptures are not just decorative pieces; they’re statement makers that add dimension and vibrancy to any wall. These art pieces can transform a room, making it more inviting and personalized.

One of the most effective ways to add color to your clay art is by painting finished pieces with acrylic paint. To achieve a smooth, even coat, apply thin layers, allowing each layer to dry completely before adding the next. Using a fan can speed up the drying process. For a more textured look, you can dab paint onto the clay using a paper towel, creating unique, mottled effects.
Painting Clay Art Pieces
When painting clay art, it’s essential to prepare your surface properly. Ensure the clay is completely dry and free of dust. Mix your acrylic paint with a suitable medium if necessary, to achieve the desired consistency. Apply the paint in thin coats, allowing each coat to dry before applying the next. This technique helps prevent the paint from pooling or running.
Creating Marbled Clay Effects
Another technique for adding color to clay is by creating marbled effects directly within the clay. This is achieved by blending different colored clays together. You can create either controlled marbling patterns or more random, organic effects, depending on your desired outcome. For striking results, combine complementary colors or contrasting shades to make your clay wall sculptures truly stand out.
To take your clay wall sculptures to the next level, consider combining painting and marbling techniques. This can add depth and visual interest to your pieces. When creating three-dimensional sculptures, ensure they are designed to hang securely on walls. Strategically use color to highlight specific elements of your sculpture, drawing the viewer’s eye to particular features.
Functional Clay Wall Art
Functional clay wall art combines aesthetics with practicality, offering a unique way to enhance your living space. This type of art is not only visually appealing but also serves a practical purpose, making it a great addition to any room.
Clay Wall Planters
Clay wall planters are a fantastic way to bring greenery into your home. By using polymer clay, you can create adorable planters that securely hold plants like air plants, adding a touch of nature to your walls. To make a clay air plant hanger, simply shape a small strip of clay into the desired form and attach it to a wall.
Clay Wall Clocks
Creating a clay wall clock is a fun and rewarding project. Start by shaping the clay into the desired clock face design, then install a clock mechanism. Ensure the mechanism is properly secured within the clay structure to guarantee accurate timekeeping. You can personalize your clock with various designs, making it a unique piece of wall art.
Functional clay wall art can be placed in various rooms, including the living room and kitchen, adding a decorative touch while serving a practical purpose. To ensure durability, use a sealant to protect the clay from moisture and wear. By coordinating your functional clay wall art with your existing home decor, you can create a cohesive and stylish space.
Boho-Inspired Clay Wall Decor
Boho-inspired clay wall decor is a fantastic way to infuse your living spaces with a free-spirited, eclectic charm. This style is all about embracing individuality and self-expression, making it perfect for those who love unique and eye-catching decor.
One of the key elements of boho-inspired clay wall decor is the use of natural and organic shapes, such as feathers and tassels. To create realistic-looking clay feathers, you can use detailed texturing techniques. Start by shaping the clay into feather forms, then use texture stamps or modeling tools to add the intricate details.
Feather and Tassel Designs
To make clay tassels that resemble fabric, you can use a combination of shaping and texturing techniques. Roll out the clay into thin ropes, then use a texture stamp to give them a fabric-like texture. You can also add beads or other embellishments to give your tassels extra flair.
Combining feathers and tassels into cohesive wall hangings is a great way to add a bohemian touch to your decor. You can arrange them in a random pattern or create a more structured design, depending on your personal style.
| Design Element | Description | Technique |
|---|---|---|
| Feathers | Realistic-looking clay feathers | Texturing with stamps or modeling tools |
| Tassels | Clay tassels with fabric-like texture | Shaping and texturing with stamps |
| Organic Shapes | Natural, nature-inspired forms | Shaping and molding clay |
Organic Shapes and Textures
In addition to feathers and tassels, boho-inspired clay wall decor often features organic shapes and textures. You can create these shapes by molding and shaping the clay into natural forms, such as leaves or flowers.
To incorporate natural textures like wood grain, stone, or plant elements into your clay pieces, you can use texture stamps or transfer techniques. This adds an extra layer of depth and visual interest to your decor.

When it comes to color palettes, boho-inspired decor often features earthy neutrals, jewel tones, or a mix of both. You can experiment with different color combinations to find the one that works best for your space.
To maximize the impact of your boho clay wall decor, consider arranging multiple pieces together. You can group them in a collage or create a gallery wall featuring different shapes, textures, and colors.
Frame and Display Ideas
The way you frame and display your clay art can significantly enhance its visual impact. Creative framing can turn your clay wall art into a stunning focal point in any room.
Customizing Frames with Clay
Creating custom clay-decorated frames is a great way to complement your artwork. You can add clay embellishments to existing frames for a coordinated look, or design entirely new frames using clay. This approach ensures that the frame doesn’t overshadow the art piece.

Mounting and Hanging Techniques
To securely mount your clay wall art, it’s essential to create holes in the clay pieces without compromising their structural integrity. Use a straw or a skewer to make precise holes, being mindful not to get too close to the edge. For hanging, consider using sturdy hardware that can support the weight of your clay art, ensuring it remains level and secure on the wall.
Advanced Clay Wall Art Projects
For those looking to push the boundaries of their creativity, advanced clay wall art projects offer a thrilling challenge. These complex projects are designed to test your skills and inspire new levels of artistic expression.

3D Landscape Wall Art
Creating 3D landscape wall art with polymer clay is a captivating project that allows you to craft intricate scenes. By rolling and sculpting the clay, you can achieve realistic terrain textures and landscape features. To add depth, incorporate perspective into your clay landscape scenes.
- Use various tools to create detailed terrain textures.
- Experiment with different clay colors to achieve a realistic landscape.
- Add small objects or beads to enhance the 3D effect.
Mixed Media Clay Creations
Combining clay with other materials like wood, metal, and fabric opens up new creative possibilities. Mixed media clay creations allow you to incorporate diverse textures and elements into your wall art. To secure bonds between clay and other materials, use appropriate adhesives.
- Choose materials that complement the clay’s texture and color.
- Experiment with different adhesives to find the strongest bond.
- Incorporate found objects or natural elements to add uniqueness.
Conclusion: Bringing Your Clay Wall Art to Life
Now that we’ve delved into the realm of clay wall art, the creative possibilities are limitless. Throughout this article, we’ve explored a wide range of DIY clay wall art ideas, from simple to complex projects, that can transform any space and reflect your personal style. Whether you’re a beginner or an experienced crafter, clay wall art offers a unique way to express yourself and create beautiful, handmade pieces for your home.
We encourage you to get creative and experiment with your own variations of these ideas. Start with a smaller project, and as you gain confidence, move on to more advanced techniques. Share your completed DIY projects on social media to inspire others and enjoy the feedback. Remember, clay wall art makes thoughtful, personalized gifts for special occasions. So, set aside some time for creative expression and begin your clay wall art journey today!